How to Make Scrolling Music
Table of Contents
- Introduction
- Required Software and Files
- Using the Terminal
- LilyPond
- Proportional Music
- Overlay
- LaTeX
- Project Files
- Emacs Configuration
- Properties
- Code Blocks
- "XFACTOR" Property
- Tables and formulas
- Projects with PRE-existing audio
- Table Formula Details
- AWK
- Changing the speed of video
- Adding Audio
- Next Steps
Introduction
This tutorial explains how to make a video of a scrolling musical score, such as those found in https://mrhunker.com . The score is typeset on a long and narrow paper-size. There is only one, continuous system in the score. The score is cropped, repeatedly, into successive frames of video. Each frame advances to the right a tiny increment. A static, red barline is overlayed onto each frame of video. The line indicates what music is playing at that moment in the video. The frames are combined, with audio, into a MP4 video with a steady tempo.
While working on this project, I recommend using Alt + Tab to switch between the following windows:
- Browser: This Online Tutorial
- Terminal: Running Various Commands
- Emacs: Editing Properties Running code blocks the mary.org file
- Frescobaldi: Editing and compiling mary.ly into PDF
The tutorial contains many steps that MUST be followed in the order they appear. Skipping a step will cause the project to fail. As a beginner, you will execute one step at a time. Later on, you will chain steps together, dramatically speeding up the process.
Before creating your own projects, you will re-create the "mary" project using template files downloaded from this web page. Later, you can modify those templates to create your own projects. Here are some variables that will or may change from one project to another:
- new title and new directory for storing the project files.
- new melody
- new set of :PROPERTIES:, such as the length (in beats) of the new piece, the length of introduction, time-signature, etc.
- new set of measurements of the downbeats of each measure, inside a table.
- change in the number of instruments, transposition of parts, clefs, key signatures, etc.
I will describe in limited detail all the steps of the project. You do not need to understand all the details of the project to complete it. Some of the steps in the process, such as the AWK code-block and the Org Table Formula, are complicated. They may take extra study to fully understand. Lack of understanding, however, should not stop you from using the process.
On a side note, all the software used in this project is amazing! I encourage you to use LilyPond for making sheet music as well. It creates beautiful scores. All the software used in this project is FREE. The workflow in this project is NOTHING like that of commercial software. I try to ease the learning curve by giving explicit instructions.
I am available to help anyone interested in learning to make scrolling videos. You can find my email address at https://mrhunker.com/contact.html (It is obscured and you will have to type it out by hand). I want to make this process as simple as possible, and I need feedback from others. These videos have been useful in my own teaching and as a practice-aid for students. My goal is to foster a small community of people making and sharing content.
Required Software and Files
I have tested this project on Linux and MacOS, but not MS Windows. All the needed software is available to MS Windows, so it should work. If your computer is running low on free disk space, you will have to clear up space before downloading software. My guess is that the software (and the software needed by the software, a.k.a dependencies) should take up a few Gigabytes of disk space.
Linux Users:
- You will need your administrative password to load software.
- You will be running commands from the Terminal (command line) application.
- To install a piece of software (my method), type:
sudo apt install <softwarename>where<softwarename>is the name of the software to install. You will then be prompted for your administrative password.
MacOS Users:
- Download MacPorts. Instructions at https://www.macports.org/install.php . MacPorts provides Linux-like software for MacOS.
- After MacPorts is installed, you can use it to download the software you will need to make these projects.
- Launch the Terminal application (found in Applications/Utilities).
- Type
sudo port install <softwarename>where<softwarename>refers to the particular software you're installing. - Enter your administrative password when prompted. The software download/install may take some time.
Windows Users:
- Download and install Cygwin. Instructions are found at https://www.cygwin.com/ .
- Once Cygwin in installed, you can use it to download the software needed for these projects.
- Launch the Windows Terminal.
- type
apt-cyg install <softwarename>where<sofwarename>refers to the particular software you're installing. NOTE: I am not that familiar with the workings of Windows. An admin password may be necessary for this step.
Download this software:
| NAME | PURPOSE | REQUIRED? |
|---|---|---|
| MacPorts | installs and runs linux-y software on MacOS | MacOS only |
| Cygwin | installs and runs linux-y software on Windows | MS Windows only |
| Gnu Emacs | contains code blocks for entire project | required |
| LilyPond | creates typeset musical scores | required |
| ImageMagick | converts .pdf to .png files; makes .png transparent | required |
| PDFtk | combines music and rulers | required |
| FFmpeg | creates and combines frames of video and audio | required |
| Frescobaldi | edits and displays LilyPond input and output | recommended |
| LaTeX | creates rulers for measurements | optional |
| pdfinfo | returns the size of .pdf documents | optional |
| Audacity | edits audio | optional |
| ffmpeg-normalize | normalizes volume of audio files | optional |
| aubio | finds time of audible start of audio files | optional |
| evince | displays .pdf documents | Frescobaldi or other PDF viewer is substitute |
| sed | modifies lines of a file based on a matching pattern | required: probably installed already |
| awk | expands table data into executable scripts | required: probably installed already |
In addition to installing the software (above), you must download the following files for this project:
I am assuming that these files are being downloaded to your Downloads/ directory.
Using the Terminal
All the files from the previous step should now be in the Downloads/ directory.
The next step is to create a new directory called Mary inside the user's home directory,
then put the files (currently in Downloads/) into that directory.
Note: This can be done with a file manager and by dragging and dropping.
But I am including the Terminal commands (below) so you'll become more familiar with the Terminal/command line.
In MacOS, the Terminal program can be found inside Applications/Utilities.
For MS Windows with Cygwin installed, a bash-like Terminal / shell should be available.
I will share more information when I have a chance to test this on a MS Windows machine.
MS Window users may also consider installing a Linux partition on their Windows computer, rather than working inside Cygwin.
All the Blocks with black backgrounds in this tutorial are Terminal examples. You will use the Terminal throughout the remainder of this project, first to move files around, then later to check on the creation of new files.
The red text in the Terminal examples are comments, included in this web page, only. They should not be typed into the Terminal.
Perform the steps, below. Press the Enter key (Return) after each command to execute it:
mrh@L540:~$ cd # change directory to user's home directory (may be there already)
mrh@L540:~$ pwd # print working directory; yours will be different
/home/mrh
mrh@L540:~$ ls # list contents of current directory (yours may vary)
bin Documents Music Videos
Desktop Downloads Pictures
mrh@L540:~$ mkdir Mary # make directory "Mary"
mrh@L540:~$ ls # list -- notice new subdirectory "Mary"
bin Documents Mary Pictures
Desktop Downloads Music Videos
Now check that the files (you should have downloaded earlier) are in the Downloads/ directory.
Note: you will likely have other files in Downloads/, as well.
mrh@L540:~$ ls Downloads/ # hint: press <TAB> while typing command for auto-completion
disappear.ly emacs-configuration.txt mary.ly mary.org music-ruler.pdf overlay-ruler.pdf
For the next six Terminal commands, you will copy files from Downloads/ rather than moving them.
Using this method, you will have backup copies of the files in Downloads/, just in case you corrupt them during the project.
The file emacs-configuration.txt file is not moved to the Mary directory.
Rather, it is moved into the user's home directory and renamed .emacs.
Note: files starting with "." (dot) are "hidden" files and will only be visible in
a directory listing when the command ls -a (list all) is entered in the Terminal.
WARNING: If you are already an Emacs user and already have a ~/.emacs file, skip this next step.
Instead, you will add the necessary customization for these projects, found in emacsCustomization.txt,
to your ~/.emacs file.
The copy command cp -n (below) includes the -n option (no-clobber).
If ~/.emacs already exists, it will not be overwritten.
mrh@L540:~$ cp -n Downloads/emacs-configuration.txt ~/.emacs # create ~/.emacs configuration file
The next five files are moved from Downloads/ to Mary/.
mrh@L540:~$ cp Downloads/disappear.ly Mary/ # copy file from Downloads to Mary
mrh@L540:~$ cp Downloads/mary.org Mary/ # note: this is all being done from my "home" directory
mrh@L540:~$ cp Downloads/mary.ly Mary/ # note: this is all being done from my "home" directory
mrh@L540:~$ cp Downloads/overlay-ruler.pdf Mary/ # use <TAB> completion to save time
mrh@L540:~$ cp Downloads/music-ruler.pdf Mary/ # all these files need to be in Mary/
Now we check that these five files are in the Mary/ directory
mrh@L540:~$ ls Mary/
disappear.ly mary.ly mary.org music-ruler.pdf overlay-ruler.pdf
Check that the hidden ".emacs" file is in the user's home directory. If nothing is returned, then the file doesn't exist.
mrh@L540:~$ ls -a .emacs
.emacs
LilyPond
There is a lot to learn about LilyPond. A template file, mary.ly, is provided to help get you started. If you make your own projects, you will need to consult the official LilyPond documentation. A complete discussion of LilyPond syntax is outside the scope of this tutorial. Here is a link to the LilyPond Learning Manual
Go to the Terminal and change the working directory to Mary/. The remaining Terminal examples in this tutorial
should be issued from inside the Mary/ directory.
mrh@L540:~$ cd Mary # change directory to "Mary"
Confirm that LilyPond is installed on your computer. If the Terminal returns nothing, then LilyPond has not been properly installed
mrh@L540:~/Mary$ which lilypond
/usr/bin/lilypond
Now, let's run LilyPond on our template file, mary.ly.
mrh@L540:~/Mary$ lilypond mary.ly # compile "mary.ly" to PDF
If mary.ly has no syntax errors and is able to locate the file disappear.ly, then you should see the following:
GNU LilyPond 2.22.1
Processing `mary.ly'
Parsing...
Interpreting music...[8]
Preprocessing graphical objects...
Finding the ideal number of pages...
Fitting music on 1 page...
Drawing systems...
Converting to `mary-staff.pdf'...
Interpreting music...[8]
Preprocessing graphical objects...
Finding the ideal number of pages...
Fitting music on 1 page...
Drawing systems...
Converting to `mary-easy.pdf'...
Interpreting music...[8]
Preprocessing graphical objects...
Finding the ideal number of pages...
Fitting music on 1 page...
Drawing systems...
Converting to `mary-overlay.pdf'...
Success: compilation successfully completed
It is common for LilyPond files to fail compilation, due to many possible errors. If there is an error, you may see something like this in the Terminal output:
mary.ly:24:37: error: GUILE signaled an error for the expression beginning here
This message tells us LilyPond found the error at line 24, character 37. Many text editors, including Emacs, have a mode for displaying line numbers. This mode can be helpful for finding errors. Frescobaldi, which is recommended for new users of LilyPond, conveniently highlights errors in the input document.
If LilyPond processes mary.ly without compilation-stopping errors, then three new PDF files are created: mary-overlay.pdf, mary-easy.pdf and mary-staff.pdf, Confirm that the new PDF files have been created by issuing the following Terminal command:
mrh@L540:~/Mary$ ls
disappear.ly mary-easy.pdf mary-staff-pdf overlay-ruler.pdf
mary.ly mary-overlay.pdf music-ruler.pdf
Alternately, the files can be listed in a "long" format.
If you re-issue the command lilypond mary.ly, the PDF files will be overridden by the newer versions,
and time-stamps of the PDF files will be updated.
mrh@L540:~/Mary$ ls -l
-rw-rw-r-- 1 mrh mrh 3446 Jun 30 18:06 disappear.ly
-rw-rw-r-- 1 mrh mrh 7651 Jun 30 18:42 mary.ly
-rw-rw-r-- 1 mrh mrh 18561 Jul 7 08:53 mary-overlay.pdf
-rw-rw-r-- 1 mrh mrh 21124 Jul 7 08:53 mary-staff.pdf
-rw-rw-r-- 1 mrh mrh 34837 Jul 7 08:53 mary-easy.pdf
-rw-rw-r-- 1 mrh mrh 66147 May 14 17:38 music-ruler.pdf
-rw-rw-r-- 1 mrh mrh 20143 Jun 30 11:09 overlay-ruler.pdf
Below is the entire input document, mary.ly, for your reference. If you are unfamiliar with LilyPond code, pay attention to the following:
- Comments start with one or more %. They are meant to be read by humans and ignored by the computer.
- Commands begin with a backslash
- The entire document is composed of many blocks. Each block starts with { and ends with }.
- A definition is a word followed by "
=". Once defined, a definition can be "called" by adding a backslash to the definition name. - \override commands change the default behavior of LilyPond.
- The actual "music" in mary.ly is inside the definition melody = \relative c' { ... }.
%% file: "mary.ly"

\version "2.22.1"                         % include \version statement. Your version may be different.
                                          % To find version, type "lilypond -v" from the command line.
#(ly:set-option 'anti-alias-factor '8)    % Improves resolution when PNG files are output.
#(set-global-staff-size 58)               % You will want to play with this setting.
#(set! paper-alist (cons '("my size" . (cons (* 200 in) (* 5.71 in))) paper-alist))  % Defining custom paper size.

\header { tagline = ##f }                 % Suppresses the printing of a default footer text at bottom of page.

\paper{
  #(set-paper-size "my size")   % paper-size must be set to the custom size we defined, above
  top-margin = 0\in             % I frequently tweak the top margin to get the spacing correct
  bottom-margin = 0\in          % when margins are not defined, they revert to default values
  left-margin = 0\in            % right-margin can also be defined
  system-count = #1             % set this to #1 to suppress line breaks, keeping music on one line
  %%line-width = 35\in          % commented out.  Uncommenting will force output to this width
  ragged-right = ##t            % prevents music lines from stretching out to the right margin.
}

\layout {                  % the layout block overrided defaults about document layout.
  indent = 10.15\in        % 10.15 inches is about the length of a video frame, allowing title to be displayed, alone
  \numericTimeSignature    % My preference is "4/4" rather than the default "C". Comment out if you like "C"
  \context {
    \Score
    proportionalNotationDuration = #(ly:make-moment 1/5)    % this fraction determines note spacing.
    \override SpacingSpanner.uniform-stretching = ##t       % must be set to ##t for proportional scores
  }
  \override Score.SpacingSpanner.strict-note-spacing = ##t  % ##t tends to crowd barlines.  Try ##f if barlines too crowded.
  \override Score.BarLine.extra-offset = #'(-0 . 0)         % adjusts bar lines by X and Y amount.  May need to play with
  \override Staff.VerticalAxisGroup.default-staff-staff-spacing = % adjust 3 values, below, to change vertical spacing.
  #'((basic-distance . 3.3)
     (minimum-distance . 3.3)
     (padding . 3.3))
  \override Score.RehearsalMark.X-offset = #-8              % In these two lines, the rehearsal mark is moved to the
  \override Score.RehearsalMark.Y-offset = #-9.5            %    left and down, creating the title.  Adjust if necessary.
  \override Score.RehearsalMark.Y-extent = ##f              % keeps the moved rehearsal mark (title) from
  \override Score.RehearsalMark.X-extent = ##f              %    unintentionally shifting the the music around
  \override Staff.InstrumentName.self-alignment-X = #RIGHT  % keeps the instrument name justified right
  \override Score.SystemStartBar.collapse-height = #40      % CHECK ON THIS. AM I USING/NOT USING system start bar?
  \override Score.StaffSymbol.thickness = #1.5              % at large global-staff-size, staff-lines get too thin.  Adjust.
  \override Score.NoteHead.Y-extent = #'(-0.5 . 0.5)        % prevents fatter easy heads from changing vertical spacing.
}

final = { \once\override Score.BarLine.extra-offset = #'(-0 . 0)  \bar "|."} %% fixes position of final barline

melody = \relative c' {     % \relative c' makes all the notes relative to middle c.  Important command
  \key d \major \time 4/4   % key and time signature set
  fis4 e d e | fis4 fis fis2 | e4 e e2 | fis4 fis fis2 |  % duration numbers only needed when change of duration
  fis4 e d e | fis4 fis fis fis | e4 e fis e | d1 \final % \final was defined, above.
}

violin = \melody                  % We already defined "melody" above. This is a unison piece
viola = \melody                   % If there were separate parts, these definitions will contain music.
cello = \transpose c c, \melody   % the cello needs to be transposed down one octave.

%% LilyPond is built on top of a computer language called "scheme".  The following is a scheme definition.
%% Later in this file, the command "\violinViolaCello" will be used.
%% The command takes four "arguments": 1. Title, 2. violinPart, 3. violaPart, 4. celloPart
%% The purpose of this scheme definition is to prevent having to type code in more than once.
violinViolaCello =
#(define-music-function
  (parser location title violinPart violaPart celloPart)
  (markup? ly:music? ly:music? ly:music?)
  #{
  <<              % Simultaneous music is enclosed by << and >>
  \new Staff {
  \mark #title    % #title is argument #1.  It is replaced by whatever markup definition is used for the title
  \clef treble
  #violinPart     % #violinPart is argument #2.
}
  \new Staff {
  \clef alto
  #violaPart      % #violaPart is argument #3
}
  \new Staff {
  \clef bass
  #celloPart      % #celloPart is argument #4
}
>>                % Here are the closing >> for the simultaneous music
  #})

redLine = {                                             % this definition will be used in the "mary-overlay.pdf" file
  s8                                                    % adjust the duration to move the red line left or right.
  \once\override Score.BarLine.color = #red             % makes the barline red.  Change if you wish.
  \override Score.BarLine.hair-thickness = #2           % adjust to make red line thinner or thicker
  \once\override Score.BarLine.extra-offset = #'(0 . 0) % change first number in case red line needs to move more.
  \once\override Score.BarLine.transparent = ##f        % makes this the ONLY barline to print in the overlay file
  \once\override Score.BarNumber.stencil = ##f          % suppresses possible printing of bar number over red line
  \bar "|"                                              % this is the barline that creates the red line.
}

mytitle = \markup \fontsize #6 \sans \line { % adjust fontsize to change size of title
  \hspace #-24                               % Adjust to fit title between 0 and 10.14 inches horizontally
  \column{                                   % BEGIN column
    \line {\vspace #0.5 }                    % adjusts vertical position of top line of title
    \line {"Mary Had a"}                     % line 1 of the title
    \line {\vspace #0.2 }                    % slight vertical space added between lines of title
    \line {"Little Lamb"}                    % line 2 of the title
  }                                          % END column
}                                            % closing bracket (all brackets must be balanced or LilyPond fails)


\book {
  \bookOutputSuffix "staff"                                  % output file "mary-staff.pdf" created
  \violinViolaCello \mytitle \violin \viola \cello           % \violinViolaCello takes 4 "arguments"
}

\book {
  \score {
    \layout {
      \easyHeadsOn \override Score.NoteHead.font-size = #3.3 % makes easy heads FATTER
    }
    \bookOutputSuffix "easy"                                 % output file "mary-easy.pdf" created
    \violinViolaCello \mytitle \violin \viola \cello         % \violinViolaCello takes 4 "arguments"
  }
}

\book {
  \bookOutputSuffix "overlay"                                % output file "mary-overlay.pdf" created
  \score {
    \layout { \include "disappear.ly" } % 1. put "disappear.ly"  directory with mary.ly, or use "full/path/to/disappear.ly"
    \violinViolaCello \mytitle { << \violin \redLine >> } \viola \cello % \violin and \redLine are simultaneous music
  }
}
Proportional Music
In order for the music in our project to scroll smoothly, the music must be made proportional. Below is a comparison between normally-spaced music and proportional music.

Figure 1: normal-spaced music.

Figure 2: proportional music.
| Normal-spaced Music | Proportional Music |
|---|---|
| uses less horizontal space | uses more horizontal space |
| spacing of ♩ slightly more than ♪ | spacing of ♩ twice an ♪ |
| uneven scrolling | even scrolling |
| pads barlines with extra, empty space | barlines and notes sometimes forced together |
Below are the settings in mary.ly that make it proportional. These settings will need to be adjusted on a project-by-project basis. You can view and edit these settings by opening mary.ly in Emacs or Frescobaldi.
The following setting is in the \paper { ... } block of mary.ly
Ragged-right is set to ##t (true), so the music extends to the right its natural length.
In most scores, each line of music stretches to the right margin, so ragged-right is, by default, ##f (false) in LilyPond.
ragged-right = ##t % prevents music lines from stretching out to the right margin.
The remaining proportional settings are within the \layout { ... } block of mary.ly
Below, notice the value 1/5. If I had chosen 1/4, that would create spacing based on a quarter-note (♩) as the default unit of spacing. If I had chosen 1/8, that would base the spacing based on 1/8th notes as the default. For tighter spacing, pick a smaller denominator; for looser spacing, pick a larger denominator.
uniform-stretching must be set to ##t (true) in proportional scores. Notice that both these settings exist within a \context { ... } block (which is itself within the \layout { ... } block).
\context {
  \Score
  proportionalNotationDuration = #(ly:make-moment 1/5)    % this fraction determines note spacing.
  \override SpacingSpanner.uniform-stretching = ##t       % must be set to ##t for proportional scores
}
Sometimes, proportional music causes notes and barlines to collide and to be too closely-spaced. In the mary.ly example, this is not an issue, so strict-note-spacing is set to ##t. However, in many projects, we may reverse this setting (##f), allowing more space at the bar-lines. This causes the music to become slightly non-proportional (but still close-enough for our scrolling purposes). For your project, consider setting the following to ##f.
\override Score.SpacingSpanner.strict-note-spacing = ##t % ##t tends to crowd barlines. Try ##f if barlines are too crowded.
Barlines sometimes need extra horizontal shifting in proportional music. extra-offset moves layout objects without concern for collisions or padding. I have included this setting, though in this example, the barlines aren't shifted at all. The two numbers indicate the X and Y axis. A negative X value moves the barline to the left.
\override Score.BarLine.extra-offset = #'(-0 . 0) % adjusts barlines by X and Y amount.
Overlay
Note: This section is just information. You don't need to take any specific action.
The file disappear.ly contains formatting instructions used to create mary-overlay.pdf.
The \override commands in disappear.ly render almost every printed symbol transparent.
Only the clefs, key-signature and a single, red barline are displayed.
Sometimes in a project, an unwanted object shows up in the overlay.
When this happens, an \override must be added to disappear.ly for that object.
The file disappear.ly is inserted, verbatim, into mary.ly where the command \include "disappear.ly" happens.
Using \include files in LilyPond saves typing.
Fixing the code in a single \include file is easier than editing many other files.
I have a single disappear.ly file on my computer that I \include in many LilyPond files.
%% file: "disappear.ly"

\version "2.22.1"

indent = #5

\override Lyrics.LyricText.transparent = ##t
\override Lyrics.LyricHyphen.transparent = ##t
\override Lyrics.LyricExtender.transparent = ##t
\override Score.Accidental.transparent = ##t
\override Score.BarLine.allow-span-bar = ##f
\override Score.BarLine.hair-thickness = #4
\override Score.BarLine.transparent = ##t
\override Score.BarNumber.transparent = ##t
\override Score.BreathingSign.transparent = ##t
\override Score.Clef.color = #darkcyan
\override Score.Dots.transparent = ##t
\override Score.DynamicText.transparent = ##t
\override Score.Fingering.transparent = ##t
\override Score.Hairpin.transparent = ##t
\override Score.InstrumentName.stencil = ##f
\override Score.InstrumentName.transparent = ##f
\override Score.InstrumentName.Y-extent = ##f
\override Score.KeySignature.color = #darkyellow
\override Score.LedgerLineSpanner.transparent = ##t
\override Score.MultiMeasureRest.transparent = ##t
\override Score.MultiMeasureRestText.transparent = ##t
\override Score.NoteHead.transparent = ##t
\override Score.RehearsalMark.transparent = ##f
\override Score.Rest.transparent = ##t
\override Score.Script.transparent = ##t
\override Score.Slur.transparent = ##t
\override Score.StaffSymbol.transparent = ##t
\override Score.Stem.transparent = ##t
\override Score.SystemStartBar.transparent = ##t
\override Score.TextScript.transparent = ##t
\override Score.Tie.transparent = ##t
\override Score.TimeSignature.transparent = ##t
\override Score.TupletBracket.transparent = ##t
\override Score.TupletNumber.transparent = ##t
LaTeX
Note: This section is FYI (for your information) and doesn't require you perform any actions. Feel free to skip this section.
The files "overlay-ruler.tex" and "music-ruler.tex are compiled by pdflatex into overlay-ruler.pdf and music-ruler.pdf. The *.tex files and the LaTeX software are not necessary for this project, as long as you have downloaded overlay-ruler.pdf and music-ruler.pdf.
If you wish to modify and/or compile "overlay-ruler.tex" and "music-ruler.tex" in LaTeX, copy and paste the code below into new files
and run pdflatex overlay-ruler.tex and pdflatex music-ruler.tex from the Terminal.
%% file: "overlay-ruler.tex

\documentclass{article}
\usepackage[paperheight=5.7in,paperwidth=200in,left=0in,right=0in,top=0.1in,bottom=0.1in]{geometry}
\usepackage{tikz}
\begin{document}

\setlength{\parindent}{0in} %% Suppress paragraph indent before first printed object.
\begin{tikzpicture}[x=1in, y=1in, scale=1]

  %% Draws the 1/10 inch grid lines
  \foreach \x in {0.1,0.2,...,7}
  \draw [color=green, line width=0.1mm](\x in,0in) -- (\x in ,5.3in);

  %% Starting with 0.5 inches, draws blue lines every inch on the half inch (e.g. 0.5, 1.5, 2.5, etc.)
  \foreach \x in {0.5,1.5,...,7}
  \draw [color=blue, line width=0.3mm](\x in,0in) -- (\x in ,5.3in);

  %% Draws red lines every inch, includes numbers from 0-7 inches
  \foreach \x in {0,1,...,7}
  \draw [color=red, line width=0.6mm](\x in,0in) -- ( \x in ,5.3in)
  node[color=black, rotate=0, anchor=west, font = {\Large\bfseries\sffamily}] {\x}; % prints numbers

\end{tikzpicture}

\end{document}
The file (above) produces the PDF output (below):

Figure 3: file: "overlay-ruler.pdf"
%% file: "music-ruler.tex

\documentclass{article}
\usepackage[paperheight=5.7in,paperwidth=200in,left=0in,right=0in,top=0.1in,bottom=0.1in]{geometry}
\usepackage{tikz}
\begin{document}

\setlength{\parindent}{0in}                  % Suppress paragraph indent before first printed object.

\begin{tikzpicture}[x=1in, y=1in, scale=1]   % Notice, below, the \end{tikzpicture}

  %% Draws the 1/10 inch grid lines
  \foreach \x in {0.1,0.2,...,200}           % loops for every value from 0.1 - 200
  \draw [color=green, line width=0.1mm](\x in,0in) -- (\x in ,5.3in);

  %% Starting with 0.5 inches, draws blue lines every inch on the half inch (e.g. 0.5, 1.5, 2.5, etc.)
  \foreach \x in {0.5,1.5,...,200}
  \draw [color=blue, line width=0.3mm](\x in,0in) -- (\x in ,5.3in);

  %% Draws red lines every inch, includes numbers from 0-200
  \foreach \x in {0,1,...,200}
  \draw [color=red, line width=0.6mm](\x in,0in) -- ( \x in ,5.3in)
  node[color=black, rotate=0, anchor=west, font = {\Large\bfseries\sffamily}] {\x};  % node contains number (in inches)

\end{tikzpicture}

\end{document}
The file (above) produces the PDF output (below):

Figure 4: music-ruler.png
Project Files
Note: This section is FYI and doesn't require any particular user actions.
The following table lists, in order, the files used and produced in our project. For each line of table, one or more INPUT FILES are run through a PROCESS, producing OUTPUT FILES. Emacs is the "project manager" for the entire project.
| INPUT FILES -—> | –> PROCESS –> | –—> OUTPUT FILES |
|---|---|---|
mary.org |
/emacs/org/babel | Supervises the entire project. |
emacs-configuration.txt |
emacs | ~/.emacs (configuration file in user home dir) |
mary.ly, disappear.ly |
lilypond | mary-staff.pdf, mary-easy.pdf, mary-overlay.pdf |
mary.ly, disappear.ly |
lilypond -fpng | mary-staff.png, mary-easy.png, mary-overlay.png |
overlay-ruler.tex, music-ruler.tex |
pdflatex (optional) | overlay-ruler.pdf, music-ruler.pdf |
mary-overlay.pdf, overlay-ruler.pdf |
pdftk | mary-overlay-measure.pdf |
mary-staff.pdf, music-ruler.pdf |
pdftk | mary-staff-measure.pdf |
mary-easy.pdf, music-ruler.pdf |
pdftk | mary-easy-measure.pdf |
| "mary-timing" TABLE | emacs/my-tbl-export | mary-timing.csv |
mary-timing.csv |
awk | mary-timing.sh |
mary-timing.sh |
shell | mary-staff.sh |
mary-staff.sh |
sed | mary-easy.sh |
mary-staff.sh |
ffmpeg | xxxxxx-mary-staff.png (multiple frames) |
mary-easy.sh |
ffmpeg | xxxxxx-mary-easy.png (multiple frames) |
000001-mary-staff.png through 0024000-mary-staff.png |
ffmpeg | video-mary-staff.mp4 |
000001-mary-easy.png through 0024000-mary-easy.png |
ffmpeg | video-mary-staff.mp4 |
mary-video-mary-staff.mp4, mary-XXbpm.wav |
ffmpeg | mary-staff-XXbpm.mp4 |
mary-video-mary-easy.mp4, mary-XXbpm.wav |
ffmpeg | mary-easy-XXbpm.mp4 |
Emacs Configuration
Note: This section is just for your information. If you followed the earlier steps and created the ~/.emacs file, then there are no more actions you need to do in this section.
The ~/.emacs file stores personal settings for Emacs. The ~/.emacs file should have already been installed in a previous step.
The following customization opens Emacs in fullscreen mode, maximized.
(custom-set-variables
 '(initial-frame-alist '((fullscreen . maximized)))
 )
My eyes are not that good. Set the default font to a larger size by adding this to .emacs file.
(set-face-attribute 'default nil :height 200)
I use commands and keystrokes rather than drop-down menus and the mouse. So, I remove the tool-bar, menu-bar and scroll-bar. I also drop the "splash" screen. These set of updates to ~/.emacs are optional.
(tool-bar-mode -1)
(menu-bar-mode -1)
(scroll-bar-mode -1)
(setq inhibit-splash-screen t)
The following is required. It allows Emacs/Org/Babel to evaluate code blocks in the following languages.
(org-babel-do-load-languages
  'org-babel-load-languages
  '(
    (emacs-lisp t)
    (latex t)
    (shell t)
    (awk t)
    (org t)
    (lilypond t)))
The following configuration stops Emacs from asking for confirmation every time a code block is evaluated.
;; don't ask user to confirm evaluation of code blocks
(setq org-confirm-babel-evaluate nil)
The following are shortcuts for our project:
;; Some time-saving shortcuts (key-bindings) for org music projects:
;; while inside table cell, C-d deletes cell value
(global-set-key (kbd "C-d") 'org-table-blank-field)
(global-set-key (kbd "C-e") 'org-babel-execute-subtree)
The following is required. It is a function that evaluates tables in Emacs Org documents:
;; Table Export Function
;; completes tables by evaluating org-table-formula below table
(defun my-tbl-export (name)
  "Search for table named `NAME` and export."
  ;; (interactive "s")
  (show-all)
  (save-excursion
    (let ((case-fold-search t))
      (if (search-backward-regexp (concat "#\\+NAME: +" name) nil t)
          (progn
            (next-line)
            (org-table-iterate)
            (org-table-export (format "%s.csv" name) "orgtbl-to-csv"))))))
Here is the entire ~/.emacs configuration file. Remember that your ~/.emacs file needs to be stored in your home directory. Some of these settings are necessary for our Mary project. Other settings are my own personal preferences.
;; This is the .emacs configuration file for Gnu Emacs.
;; It is used to store user-customization of Emacs.

;; emacs launches in fullscreen
(custom-set-variables
 '(initial-frame-alist '((fullscreen . maximized)))
 )

;; larger font-size, easier to read
(set-face-attribute 'default nil :height 200)

;; remove unused window elements
(tool-bar-mode -1)
(menu-bar-mode -1)
(scroll-bar-mode -1)
(setq inhibit-splash-screen t)

;; necessary for emacs-org-babel to evaluate code blocks
(org-babel-do-load-languages
  'org-babel-load-languages
  '(
    (emacs-lisp t)
    (latex t)
    (shell t)
    (awk t)
    (org t)
    (lilypond t)))

;; suppresses the prompt to confirm code block evaluation.
(setq org-confirm-babel-evaluate nil)

;; table export function: used to evaluate table formulas to completion
(defun my-tbl-export (name)
  "Search for table named `NAME` and export."
  ;; (interactive "s")
  (show-all)
  (save-excursion
    (let ((case-fold-search t))
      (if (search-backward-regexp (concat "#\\+NAME: +" name) nil t)
          (progn
            (next-line)
            (org-table-iterate)
            (org-table-export (format "%s.csv" name) "orgtbl-to-csv"))))))
Properties
From the Terminal, launch Emacs and the file mary.org with the following command:
mrh@L540:~/Mary$ emacs mary.org & # launch Emacs
If there is a problem with the ~/.emacs configuration file, a message will be printed to the screen when Emacs is opened.
The centerpiece of our project is mary.org. When a file ending with the extension ".org" is opened, Emacs enters "org-mode". The simplest way, as an Emacs beginner, to navigate through mary.org, is with the arrow keys.
The web page you are reading is written using Org-mode. Org is a "mode" of Emacs where certain rules apply and commands are interpreted a certain way. A basic feature of Org is visibility cycling. That means, when you place the cursor on a Headline (starting with one or more "*") and press TAB, you can show or hide the contents under that headline.
The "Babel" library (link) extends Org's capability by allowing Org to evaluate code blocks in a variety of programming languages. My scrolling projects are composed of many code blocks. Each code block performs a small portion of the project.
At the top of mary.org is the section :PROPERTIES: It sets variables that are used throughout the org file. The line :header-args+: :var title="mary" means that, inside code blocks, ${title}.ly is replaced by mary.ly. This is convenient, because now I don't have to re-write each code block after changing the "title" from "mary" to something else. All I have to do is change the value of "title" in :PROPERTIES:.
Below is the :PROPERTIES: drawer for mary.org.
Place the cursor is over the word :PROPERTIES: and press the TAB key repeatedly.
The :PROPERTIES: drawer will be alternately shown and hidden.
This is a feature of Emacs' "org-mode".
:PROPERTIES:
:header-args: :var BPM=60 :var ORIGBPM=60
:header-args+: :var title="mary"
:header-args+: :dir "/path/to/yourhomedirectory/Mary"
:header-args+: :var introlength=0 :var songlength=40 :var iterations=1 :var ORIGFPS=60
:header-args+: :var musicruler="/path/to/yourhomedirectory/music-ruler.pdf"
:header-args+: :var overlayruler="/path/to/yourhomedirectory/overlay-ruler.pdf"
:header-args+: :var externalSequencer="Digitone"
:ITERATIONS: 1
:TS: 4
:ORIGBPM: 60
:ORIGFPS: 60
:FINALX: 190.57
:OFFSET: 2.71
:AUDIOEND: 90.551
:XFACTOR: 1.4027777777777777
:END:
The :PROPERTIES: starting with :header-args: are recognized inside code blocks. The standalone properties, such as :OFFSET: that are not header-arguments are recognized in tables.
Now, in :PROPERTIES: you must change the three occurrences of : /path/to/yourhomedirectory/ to your own path.
My personal path would be /home/mrh/. If I were on a Mac, it might be /Users/mrh/.
To assure the value /path/to/yourhomedirectory/ is correct, return to the Terminal, and type the following command
(I am assuming you are still in the Mary/ directory):
mrh@L540:~/Mary$ pwd # print working directory
/home/myusername/Mary
After making the changes to :PROPERTIES: in mary.org, save the change you just made in Emacs by typing: C-x C-s (While Holding Ctrl/Command, press "x" then "s").
This saves the changes. In the minibuffer at the bottom of the Emacs screen, you should now see the message:
Wrote /home/username/Mary/mary.org
Note: When you make your own projects, you will change the :PROPERTIES: :header-args: title.
You also may change the ORIGBPM (original beats per minute), the TS (time signature) and other :PROPERTIES:.
I have included other :PROPERTIES: not used in this particular project. You can add your own :PROPERTIES:.
Just be aware that :PROPERTIES: used in code blocks must include the :header-args+: designation.
Notice, too, that when there is more than one line of :header-args:, all but the first line get "+" attached to them.
A word about "property inheritance":
Notice that in mary.org, :PROPERTIES: happen under the headline * SCROLL.
Since * SCROLL has only one *, that makes it a "top level" headline.
* SCROLL is the ONLY top-level headline in mary.org.
So, that effectively makes the variables in the :PROPERTIES: drawer available to ALL of mary.org.
If, on the other hand, the :PROPERTIES: drawer were placed under a "second-level" headline (**), then the :PROPERTIES:
would only be available to that portion ("subtree") of the document.
Code Blocks
Most of the remainder of mary.org is composed of code blocks. Code blocks in Emacs Org can be written in a variety of languages. I have highlighted code blocks in light blue in this tutorial.
In the first code block, ${title}.ly is converted to mary.ly
through a process called "parameter expansion".
The value of "title", found in the :PROPERTIES: :header-args: title="mary", is substituted.
A code block does nothing until it is evaluated. To evaluate a code block, put the cursor
somewhere inside the code block and type C-c C-c . That means: While holding down the Control key, type "c", twice.
Note: on Macintosh computers, the "Command" key is the control key.
If you ever mis-type a command in Emacs and appear to be "stuck" in the minibuffer (at the bottom of the screen),
type Esc Esc Esc (3 times). That should return you to a normal state.
Our first code-block runs LilyPond on mary.ly, producing a few output PDF files
(Remember to evaluate the code block with C-c C-c and the curser inside the code block).
You may remember that we did this step earlier in the Terminal. No problem. LilyPond will run again,
and the old output files will be overwritten by the newer versions.
#+NAME: make-music-pdf
#+BEGIN_src shell
lilypond ${title}.ly
#+end_src
The next code block is identical to the first, except that LilyPond outputs .png files.
The command argument -fpng means format png.
#+name: make-music-png
#+begin_src shell :results none
lilypond -fpng ${title}.ly
#+end_src
The next code block relies on ImageMagick being installed. It makes the file mary-overlay.png transparent so it can be used as an overlay on top of both mary-staff.pdf and mary-easy.pdf.
mary-overlay.png is an unusually long and narrow file that may violate a security policy of ImageMagick. In order to remedy this, the file /etc/ImageMagick-6/policy.xml needs to be modified.
Run the following command from the Terminal (I am currently using version 6 of ImageMagick; Your version may vary).
mrh@L540:~/Mary$ sudo emacs /etc/ImageMagick-6/policy.xml
You will be prompted for your admin password. Then another instance of Emacs will open the policy.xml file.
This particular Emacs, will be able to edit "locked" files.
If this Emacs opens up with two vertically placed "split" windows, you can maximize the top half by typing C-x C-1.
This is a useful shortcut.
Now, Find the following line in the open file, policy.xml:
<policy domain="resource" name="width" value="8KP"/>
Change it to:
<policy domain="resource" name="width" value="25KP"/>
Press C-x C-s to save the changes to policy.xml
Press C-x C-c to exit that Emacs (your other emacs should still be open).
Now you should be able to run the following command without error:
#+name: make-overlay-transparent
#+begin_src shell :results none
convert -transparent white "${title}-overlay.png" "${title}-overlay.png"
#+end_src
Evaluation of the next code block is optional. It is only necessary when starting a new project in a new directory.
#+name: kill-viewpdf-buffer
#+begin_src emacs-lisp :results none
(kill-buffer "viewpdf")
#+end_src
The next code block combines mary-overlay.pdf and overlay-ruler.pdf creating a new file, mary-overlay-measure.pdf.
#+name: combine-overlay-and-ruler
#+begin_src shell :results none
pdftk ${title}-overlay.pdf background ${overlayruler} output ${title}-overlay-measure.pdf
#+end_src
The next code block opens the file mary-overlay-measure.pdf.
On my machine, the command for opening PDF documents is evince.
Evince is included in Linux distributions.
It can be installed on a MacOS via MacPorts, or on a Windows machine via Cygwin.
PDF viewers are a matter of personal taste.
If you are using something other than evince to open PDFs, you will need to
replace evince --fullscreen with another command, in the code block, below.
#+name: open-overlay-measure
#+begin_src shell :results none :session viewpdf
evince --fullscreen ${title}-overlay-measure.pdf &
#+end_src
Now you should see something like this:

Figure 5: mary-overlay-measure.pdf
Check the position of the red line in mary-overlay-measure.pdf (above).
Then scroll to the top of mary.org and set :PROPERTIES: :OFFSET: 2.71 (your value may vary).
The position of the red line changes from one project to another, based on spacing settings and the number of sharps or flats in the key-signature. I like the value to be between 2 and 3 inches. The closer the red line is to the left margin, the better the musician can anticipate the upcoming notes.
In the next set of code blocks, we create the files mary-staff-measure.pdf and mary-easy-measure.pdf.
This is done by overlaying music-ruler.pdf over mary-staff.pdf.
#+name: create-staff-measure
#+begin_src shell :results none
pdftk ${title}-staff.pdf background ${musicruler} output ${title}-staff-measure.pdf
#+end_src
Open mary-staff-measure.pdf. Keep it open. You will use it to fill in values in the "mary-timing" table (later).
#+name: view-staff-measure
#+begin_src shell :results none :session viewpdf
evince --fullscreen ${title}-staff-measure.pdf &
#+end_src
Running the command (above) should open (below):

Figure 6: mary-staff-measure.pdf
Now, superimpose music-ruler.pdf over mary-easy.pdf.
#+name: create-easy-measure
#+begin_src shell :results none
pdftk ${title}-easy.pdf background ${musicruler} output ${title}-easy-measure.pdf
#+end_src
Open mary-easy-measure.
#+name: view-easy-measure
#+begin_src shell :results none :session viewpdf
evince --fullscreen ${title}-easy-measure.pdf &
#+end_src
Running the command (above) should open (below):

Figure 7: mary-easy-measure.pdf
Check that the horizontal positions of notes in mary-staff-measure.pdf and mary-easy-measure.pdf are the same.
They are the same in the above examples. If, however, in your own project, they are not the same, then:
- mary.ly needs to be opened in an editor (Frescobaldi or Emacs)
- the denominator in proportionalNotationDuration must be made larger (or the fraction smaller).
- You must re-start the project at the
lilypond mary.lyandlilypond -fpngcode blocks.
"XFACTOR" Property
Note: You may skip all the code blocks in this section of mary.org. This section is for information purposes, only. There are no specific actions you need to take. All that matters, here, is that the following line is included in :PROPERTIES:: :XFACTOR: 1.4027777777777777
When PDF documents are converted to PNG, there is a change in their size. This change will be factored into the table, later in this project. This factor is my least well-understood aspect of this project workflow. Maybe one day someone will explain how to remove it, altogether.
#+name: return-png-length
#+begin_src shell :results verbatim
ffprobe ${title}-staff.png 2>&1 | grep "Stream" | awk '{print $6}' | sed 's/\([0-9]*\)x[0-9]*/\1/'
#+end_src
#+RESULTS: return-png-length
: 20200
#+name: return-pdf-length
#+begin_src shell :results verbatim
pdfinfo ${title}-staff.pdf | grep "Page size:" | awk '{print $3}'
#+end_src
#+RESULTS: return-pdf-length
: 14400
#+name: return-x-factor
#+begin_src emacs-lisp :var png-length=return-png-length :var pdf-length=return-pdf-length
(/
(float (string-to-number png-length))
(float (string-to-number pdf-length)))
#+end_src
#+RESULTS: return-x-factor
: 1.4027777777777777
Tables and formulas
The table, below, can be copied and reused. For the projects I'm describing here, we only fill-in the first and second column. The remaining columns are derived from math done with the numbers in the second column and some :PROPERTIES:. The song "Mary Had a Little Lamb" has a two-measure intro, and the song lasts 8 measures. Each row of the table (excepts for the "header" row) corresponds to a measure of music.
At the bottom of the table is a table formula (#+TBLFM:). Notice that it runs past the right margin of this web page. Table formulas must be written on a single line.
Give the table, below, the #+NAME:. title-timing. In this case, the title is "mary".
#+NAME: mary-timing
| MEASURE | INPUT-X | ADJUST-X | NEXT-X | X-START | X-END | RANGE | T-START | T-END | FRAMES | INCREMENT |
|---------+---------+----------+--------+---------+-------+-------+---------+-------+--------+-----------|
|  Intro1 |    2.71 |          |        |         |       |       |         |       |        |           |
|  Intro2 |    9.87 |          |        |         |       |       |         |       |        |           |
|       1 |   12.39 |          |        |         |       |       |         |       |        |           |
|       2 |   14.91 |          |        |         |       |       |         |       |        |           |
|       3 |   17.43 |          |        |         |       |       |         |       |        |           |
|       4 |   19.95 |          |        |         |       |       |         |       |        |           |
|       5 |   22.47 |          |        |         |       |       |         |       |        |           |
|       6 |   24.98 |          |        |         |       |       |         |       |        |           |
|       7 |   27.51 |          |        |         |       |       |         |       |        |           |
|       8 |   30.05 |          |        |         |       |       |         |       |        |           |
#+TBLFM: @2$2=$PROP_OFFSET::$3=($2-$PROP_OFFSET)*$PROP_XFACTOR::@>$4=($PROP_FINALX-$PROP_OFFSET)*$PROP_XFACTOR::$4=@+1$3::$5=fround($3*72);%.0f::$6=(@+1$5)-1::@>$6=fround($PROP_XFACTOR*(($PROP_FINALX-$PROP_OFFSET)*72));%.0f::$7=($6-$5)+1::$8=((@#-2)*(60 / $PROP_ORIGBPM))*$PROP_TS::$9=@+1$8::@>$9=@>$8+(60/$PROP_ORIGBPM)*$PROP_TS::$10=fround(($9-$8)*$PROP_ORIGFPS);%.0f::$11=($7/$10)
Column 1: This is just a description of the measure. If you add measures to the table, add measure numbers accordingly.
To add measures (rows), place the cursor in the final row and press Enter. A new row will be created. If the table lines
become misaligned, type TAB inside the table, and the table should re-align itself. If you make a mistake and something weird happens,
you can type C-/ (Ctrl+forward-slash) to "undo" one or more previous edits.
Column 2: Fill the position of the first notehead in each measure…for measures 1-8…into the table. Use the file (see below) mary-staff-measure.pdf as a reference. I use the left edge of the note as the fill-in value.
Once you have filled in the the INPUT-X values for measures 1-8, you can calculate the INPUT-X for Intro2.
Intro2 gets its value from finding the average distance a measure travels.
We can do this crudely by subtracting the position of a measure's downbeat from the next measure's downbeat.
Measure 2 - Measure 1 = 14.91 - 12.39 = 2.52. So Intro2 is 2.52 less than Measure 1.
That makes Intro2 equal 9.87.
If there are multiple measures of intro, subtract 2.52 again for the previous measure.
Intro1 will get its value from the :PROPERTIES: :OFFSET: that we alreay assigned value to. I am including that value in the table, above. You can leave it out, however, because it will be added automatically in the next code block.
There is ONE MORE table value that must to be entered. It is not entered directly into the table, however. Go to the top of mary.org and find :PROPERTIES: :FINALX:. Now you must calulate where the position of the first note in the bar would be…on an imaginary 9th bar of music. You can do this pretty accurately by finding the distance between bar 7 and bar 8, then adding that to bar 8. Or, more simply, just find a point a bit after the final barline. Warning: Without :PROPERTIES: :FINALX:, the music will not properly scroll to the end.

Figure 8: maryStaffMeasure.png
Now, evaluate the entire table by typing C-c C-c inside the following code block.
#+name: table-export-function
#+begin_src emacs-lisp :results none
(my-tbl-export "timing")
#+end_src
All the empty fields in the table should now contain numbers. A couple things to check on: In the column INCREMENT the values (except for the first meaure(s)) should be consistent. If one value differs, that may indicate a recording error in the INPUT-X column. It is, however, normal for there to be small variations in the values of INCREMENT.
#+NAME: mary-timing
| MEASURE | INPUT-X |  ADJUST-X |    NEXT-X | X-START | X-END | RANGE | T-START | T-END | FRAMES | INCREMENT |
|---------+---------+-----------+-----------+---------+-------+-------+---------+-------+--------+-----------|
|  Intro1 |    2.71 |        0. | 10.043889 |       0 |   722 |   723 |       0 |     4 |    240 |    3.0125 |
|  Intro2 |    9.87 | 10.043889 | 13.578889 |     723 |   977 |   255 |       4 |     8 |    240 |    1.0625 |
|       1 |   12.39 | 13.578889 | 17.113889 |     978 |  1231 |   254 |       8 |    12 |    240 | 1.0583333 |
|       2 |   14.91 | 17.113889 | 20.648889 |    1232 |  1486 |   255 |      12 |    16 |    240 |    1.0625 |
|       3 |   17.43 | 20.648889 | 24.183889 |    1487 |  1740 |   254 |      16 |    20 |    240 | 1.0583333 |
|       4 |   19.95 | 24.183889 | 27.718889 |    1741 |  1995 |   255 |      20 |    24 |    240 |    1.0625 |
|       5 |   22.47 | 27.718889 | 31.239861 |    1996 |  2248 |   253 |      24 |    28 |    240 | 1.0541667 |
|       6 |   24.98 | 31.239861 | 34.788889 |    2249 |  2504 |   256 |      28 |    32 |    240 | 1.0666667 |
|       7 |   27.51 | 34.788889 | 38.351944 |    2505 |  2760 |   256 |      32 |    36 |    240 | 1.0666667 |
|       8 |   30.05 | 38.351944 | 41.999167 |    2761 |  3024 |   264 |      36 |    40 |    240 |       1.1 |
#+TBLFM: @2$2=$PROP_OFFSET::$3=($2-$PROP_OFFSET)*$PROP_XFACTOR::@>$4=($PROP_FINALX-$PROP_OFFSET)*$PROP_XFACTOR::$4=@+1$3::$5=fround($3*72);%.0f::$6=(@+1$5)-1::@>$6=fround($PROP_XFACTOR*(($PROP_FINALX-$PROP_OFFSET)*72));%.0f::$7=($6-$5)+1::$8=((@#-2)*(60 / $PROP_ORIGBPM))*$PROP_TS::$9=@+1$8::@>$9=@>$8+(60/$PROP_ORIGBPM)*$PROP_TS::$10=fround(($9-$8)*$PROP_ORIGFPS);%.0f::$11=($7/$10)
Projects with PRE-existing audio
In this project, I am showing you how to create a video that will have audio added to it, later.
But, what if audio already exists, and you must create a video to fit with the audio?
This section explains the modifications to the table necessary for such projects.
We are assuming that the audio is not metronomic. In other words, it speeds up and slows down.
When the audio timing is exact, we can use math to derive the values under T-START.
But, in this case, you will have to manually fill-in the values of T-START.
First, you must replace the #+TBLFM:, above, with the #+TBLFM:, below.
This alternate table-formula is included in mary.org.
The alternate table doesn't calculate the values of T-START.
TABLE FORMULA FOR MANUAL AUDIO TIMING
#+TBLFM: @2$2=$PROP_OFFSET::$3=($2-$PROP_OFFSET)*$PROP_XFACTOR::@>$4=($PROP_FINALX-$PROP_OFFSET)*$PROP_XFACTOR::$4=@+1$3::$5=fround($3*72);%.0f::$6=(@+1$5)-1::@>$6=fround($PROP_XFACTOR*(($PROP_FINALX-$PROP_OFFSET)*72));%.0f::$7=($6-$5)+1::$9=@+1$8::@>$9=$PROP_AUDIOEND::$10=fround(($9-$8)*$PROP_ORIGFPS);%.0f::$11=($7/$10)
If you are unfamiliar with Emacs editing commands, use the following sequence to switch table formulas:
- Place the cursor at the beginning of the original table formula.
- Press
C-SPACE. This is the shortcut forM-x set-mark-command. - Press the down arrow once. The entire table-formula should now be highlighted.
- Press
C-w. This is the shortcut forM-x kill region. The table formula should disappear. - Use the arrow keys to move the curser to an empty line, somewhere below the table. (We are finding a temporary location for the original table formula.)
- Press
C-y. The original table formula should appear starting at the cursor position. - Now, place the cursor at the beginning of the new table-formula.
- Press
C-SPACE. - Press the down arrow once.
- Press
C-w. - Place the cursor at the beginning of the line, in the very next line below the table.
- Press
C-y. The new table-formula should now be positioned correctly below the table. (Note: a table formula only works when it is directly below the table.)
Note: Emacs commands may seem like a pain to learn, but there are just a couple dozen of them that perform 98% of all my editing.
When using the table formula for manual audio timing, you must also manually fill in the values for the column T-START. To get those values, open up your pre-existing audio file in an audio editor (I use Audacity). While listening and pausing the audio, find the values, in seconds (e.g. 2 minutes = 120 seconds), at the point where each measure (table line) begins. The table will not complete itself correctly unless you adding those values.
Lastly, switch back to Emacs and in mary.org, go to :PROPERTIES: :AUDIOEND: and enter the timing where the end of the audio corresponds to the end of the video. Now, the table is ready to be evaluated.
Table Formula Details
Note: This is another "informational" section. There are no specific user tasks in this section.
You don't have to understand the #+TBLFM: (org-table-formula) in order to use it. But, I will try to explain it, anyway. If you have ever used a spreadsheet program that automatically calculates the values of certain fields and columns…that is what we are doing in Emacs Org tables.
In a nutshell, we are creating a video that scrolls at a fixed tempo (e.g. ♩ = 60) To understand the table, let us examine the following scenario:
If our audio runs metronomically at 60 beats per minute, and if there are 4 beats in measure, that means a measure takes 4 seconds.
The frame rate is set at 60fps (frames per second) for the entire video. If a measure takes 4 seconds, then 240 frames of video happen in every measure.
Since it is currently not possible to make music that is exactly proportional, we must check the position of the first note of each measure. For what remains of the 240 frames per measure, we divide the distance the music moves in a measure by 240 to get an "increment". That is, the amount of horizontal space a frame of video shifts from one frame to the next. The increment is going to vary, slightly, from one measure to the next.
The red line of code directly below the table starting with #+TBLFM: is the "table formula". Unfortunately, it must be kept on a single line for it to work. This makes it difficult to examine. The table formula does the job of filling in the remaining values of the table. Almost all the mathematical calculations in this project are done by the #+TBLFM:. In table-formula-syntax, $1 refers to the first column, $2 the second column, etc. I am splitting the table formula into its components, so you can understand it better.
Here are the column "headers" (top row) of the table:
| MEASURE# | INPUT-X | ADJUST-X | NEXT-X | X-START | X-END | RANGE | T-START | T-END | FRAMES | INCREMENT |
|----------+---------+----------+--------+---------+-------+-------+---------+-------+--------+-----------|
Below is an explanation for each of the table headers.
MEASURE#: Just a label for the measure number. Not used in any calculations
INPUT-X: You must enter the position of the first note for every measure into this column
ADJUST-X: X-position adjusted by :PROPERTIES: :OFFSET: and :XFACTOR:
NEXT-X: The value of ADJUST-X for the next row
X-START: Position of X at the beginning of the measure
X-END: Position of X at the end of the measure
RANGE: The number of points (1⁄72 inch) movement from one measure to the next.
T-START: Elapsed time at the start of the measure (fill-in manually for projects with pre-existing audio).
T-END: Elapsed time at the end of the measure.
FRAMES: the number of frames produced for the current measure.
INCREMENT: The amount each frame moves forward for the current measure.
Below is the table formula broken into its component parts. A pair of colons separates each portion of an un-broken table-formula.
| Portion of Table Formula | Explanation |
|---|---|
| #+TBLFM: | table formulas start with this |
| @2$2=$PROP_OFFSET | second row, second column = :PROPERTIES: :OFFSET: |
| $3=($2-$PROP_OFFSET)*$PROP_XFACTOR | X-INPUT adjusted by :PROPERTIES: :XOFFSET: and :XFACTOR: |
| @>$4=($PROP_FINALX-$PROP_OFFSET)*$PROP_XFACTOR | final row of NEXT-X = :PROPERTIES: (:FINALX: - :OFFSET:) * :XFACTOR: |
| $4=@+1$3 | NEXT-X = value of the next row of ADJUST-X |
| $5=fround($3*72);%.0f | X-START = (ADJUST-X * 72) rounded and made into integer |
| $6=(@+1$5)-1 | X-END is 1 less than X-START of next row |
| @>$6=fround($PROP_XFACTOR*(($PROP_FINALX-$PROP_OFFSET)*72));%.0f | final X-END = rounded integer (:PROPERTIES: :X-FACTOR: * (:FINAL-X: - :OFFSET:) * 72) |
| $7=($6-$5)+1 | RANGE = (X-START - X-END) + 1 |
| $8=((@#-2)*(60 / $PROP_ORIGBPM))*$PROP_TS | T-START = row-number * (60 / :PROPERTIES: :BPM:) * :PROPERTIES: :TS: |
| $9=@+1$8 | T-END = value of the next row of T-START |
| @>$9=@>$8+(60/$PROP_ORIGBPM)*$PROP_TS | final row of T-END = T-START + (60 / :PROPERTIES: :ORIGBPM:) * :PROPERTIES: :TS: |
| $10=fround(($9-$8)*$PROP_ORIGFPS);%.0f | FRAMES = (T-END - T-START) * :PROPERTIES: :ORIGFPS: |
| $11=($7/$10) | INCREMENT = (RANGE / FRAMES) |
Evaluating the table-export function creates a new file, timing.csv.
CSV means "comma separated values".
Examine the new file, timing.csv, by issuing this command in the Terminal:
mrh@L540:~/Mary$ cat timing.csv # cat command prints file to screen
MEASURE,INPUT-X,ADJUST-X,NEXT-X,X-START,X-END,RANGE,T-START,T-END,FRAMES,INCREMENT
Intro1,2.71,0.,10.043889,0,722,723,0,4,240,3.0125
Intro2,9.87,10.043889,13.578889,723,977,255,4,8,240,1.0625
1,12.39,13.578889,17.113889,978,1231,254,8,12,240,1.0583333
2,14.91,17.113889,20.648889,1232,1486,255,12,16,240,1.0625
3,17.43,20.648889,24.183889,1487,1740,254,16,20,240,1.0583333
4,19.95,24.183889,27.718889,1741,1995,255,20,24,240,1.0625
5,22.47,27.718889,31.239861,1996,2248,253,24,28,240,1.0541667
6,24.98,31.239861,34.788889,2249,2504,256,28,32,240,1.0666667
7,27.51,34.788889,38.351944,2505,2760,256,32,36,240,1.0666667
8,30.05,38.351944,41.999167,2761,3024,264,36,40,240,1.1
AWK
For the AWK code block (further below) to work, I have to create a "helper" code block that returns the "title" of our project ("mary"). The #+RESULTS: of this code block will be "called" by the next code block. Sorry, this is rather kludgy, but currently I am not aware of a good workaround.
You do not have to explicity evaluate this code block. It will be "called" by the AWK code block.
#+name: get-title
#+begin_src shell
echo ${title}
#+end_src
#+RESULTS: get-title
: mary
I use the AWK utility to transform timing.csv into timing.sh. For each line in mary-timing.csv, AWK constructs a detailed command from the values in that line. The commands will make frames of video corresponding to each measure of music. A full discussion of AWK is outside the scope of this tutorial. But, by comparing the AWK code (below) and the resulting file mary-timing.sh (further down), you can learn how AWK works in this example.
#+name: awk-create-timing-shell-file
#+begin_src awk :in-file (concat (org-sbe get-title) "-timing" ".csv") :results value file :file (concat (org-sbe get-title) "-timing" ".sh")
BEGIN { NR>1; FS=","; print "frame=1\n" }
{print "# MEASURE: " $1 "\n"\
"xStart=" $5 "; xEnd=" $6 ";increment=" $11 ";\n"\
"for i in $(seq 1 " $10 "); do\n"\
"xPos=`echo \"" $11 " * $i + " $5 "\" | bc | bc`;\n"\
"echo \"ffmpeg -hide_banner -loglevel error -y \\\n\
-i " title "-staff.png -i " title "-overlay.png \\\n\
-filter_complex \"crop=1024:576:" "${xPos}" ":0,overlay\" " \
"$(printf \"%06d\" $frame)" "-" title "-staff.png\";\n"\
"done\n"
}
#+end_src
You can see some of the newly created mary-timing.sh with this command in the Terminal:
mrh@L540:~/Mary$ cat mary-timing.sh | less # cat command prints file to screen
frame=1
# MEASURE: Intro1
xStart=0; xEnd=722;increment=3.0125;
for i in $(seq 1 240); do
xPos=`echo "3.0125 * $i + 0" | bc | bc`;
echo "ffmpeg -hide_banner -loglevel error -y \
-i mary-staff.png -i mary-overlay.png \
-filter_complex "crop=1024:576:${xPos}:0
frame=$((frame+1));
done
# MEASURE: Intro2
xStart=723; xEnd=977;increment=1.0625;
for i in $(seq 1 240); do
xPos=`echo "1.0625 * $i + 723" | bc | bc`;
echo "ffmpeg -hide_banner -loglevel error -y \
-i mary-staff.png -i mary-overlay.png \
-filter_complex "crop=1024:576:${xPos}:0
frame=$((frame+1));
done
# MEASURE: 1
xStart=978; xEnd=1231;increment=1.0583333;
for i in $(seq 1 240); do
xPos=`echo "1.0583333 * $i + 978" | bc | bc`;
echo "ffmpeg -hide_banner -loglevel error -y \
-i mary-staff.png -i mary-overlay.png \
-filter_complex "crop=1024:576:${xPos}:0
frame=$((frame+1));
done
:
- At the beginning of timing.sh (above), frame=1.
- The value of "frame" will is incremented for for each successive frame of video.
- Each paragraph of code in
timing.sh(above) refers to a measure of music. - At the top of each code-paragraph are three values: xStart, xEnd and increment.
- These values originated from the "mary-timing" table, above.
- The value of "xPos" (x-position) for each frame is determined by multiplying the increment by the current loop number (1-240).
- There is a "for" loop for every measure, creating 240 frames of video in the measure.
$(printf "%06d" $frame)formats the name of the output frame, so instead of "1-staff.png", the first frame is named000001-staff.png. This is necessary, as the frames are going to be sorted numerically and combined into a video. Without the formatting, the computer would process11-staff.pngbefore2-staff-png, which is incorrect.
The file mary-timing.sh has been created, but it needs to be run.
To do so, evaluate this code block with C-c C-c.
#+name: convert-timing-to-compile-shell
#+begin_src shell
sh ./mary-timing.sh > ${title}-staff.sh
#+end_src
Now we have created the file mary-staff.sh. Every line in mary-staff.sh will create a frame of video.
mrh@L540:~/Mary$ cat mary-staff.sh | less # cat command prints file to screen
ffmpeg -hide_banner -loglevel error -y -i mary-staff.png -i mary-overlay.png -filter_complex crop=1024:576:3.0125:0,overlay 000001-staff.png
ffmpeg -hide_banner -loglevel error -y -i mary-staff.png -i mary-overlay.png -filter_complex crop=1024:576:6.0250:0,overlay 000002-staff.png
ffmpeg -hide_banner -loglevel error -y -i mary-staff.png -i mary-overlay.png -filter_complex crop=1024:576:9.0375:0,overlay 000003-staff.png
ffmpeg -hide_banner -loglevel error -y -i mary-staff.png -i mary-overlay.png -filter_complex crop=1024:576:12.0500:0,overlay 000004-staff.png
ffmpeg -hide_banner -loglevel error -y -i mary-staff.png -i mary-overlay.png -filter_complex crop=1024:576:15.0625:0,overlay 000005-staff.png
(more lines ...)
ffmpeg -hide_banner -loglevel error -y -i mary-staff.png -i mary-overlay.png -filter_complex crop=1024:576:3022.8:0,overlay 002398-staff.png
ffmpeg -hide_banner -loglevel error -y -i mary-staff.png -i mary-overlay.png -filter_complex crop=1024:576:3023.9:0,overlay 002399-staff.png
ffmpeg -hide_banner -loglevel error -y -i mary-staff.png -i mary-overlay.png -filter_complex crop=1024:576:3025.0:0,overlay 002400-staff.png
Explanation of the FFmpeg commands in staff.sh (above):
ffmpegis the command name.-hide_banner -loglevel erroris optional, limits the console output of ffmpeg, might speed up ffmpeg-i mary-staff.png -i mary-overlay.pngare the two input files.-filter_complex crop=1024:576:3025.0:0crops the video to 1024x576 points starting at the coordinate 3025.0:0.-overlayoverlays the second input-file upon the first input-file.002400-staff.pngis the filename of a single frame of video.
Note: Notice the crop portion of the FFmpeg command, above.
It crops to 1024:576 pixels. This conforms to the popular video aspect ratio of 16:9.
If you want to change the aspect ratio of your videos, you will have to change all the occurrences of these numbers
within the mary.org file. Also, notice the custom height of the file mary.ly, 5.71 inches.
This height produces a PNG output height of 576 pixels. If you change the overall height and width of your videos, you will
need to also change the 5.71 value in mary.ly accordingly.
Now we create mary-easy.sh by modifying mary-staff.sh, changing every occurrence of the string "staff" to "easy".
This is accomplished using sed, a "stream editor."
#+name: make easy-heads-shell-file
#+begin_src shell :results none
cat ${title}-staff.sh | sed 's/staff/easy/g' > ${title}-easy.sh
#+end_src
Now it is time to make all the frames of video for both the mary-staff and mary-easy videos. This step, depending on the length of the music, can take up to a few hours. The frame creation is launched by something called "start-process". It allows the frame creation to take place "behind the scenes."
Evaluate the next code block to start creating frames for the staff video.
#+name: ffmpeg-create-staff-frames
#+begin_src emacs-lisp :results none
(when (file-exists-p (concat title "-staff.png"))
(start-process "staff-frames" "ffmpeg-staff" "sh" (concat "./" title "-staff.sh")))
#+end_src
Run this code block to start creating frames for the easy video.
#+name: ffmpeg-create-easy-frames
#+begin_src emacs-lisp :results none
(when (file-exists-p (concat title "-easy.png"))
(start-process "easy-frames" "ffmpeg-easy" "sh" (concat "./" title "-easy.sh")))
#+end_src
Run the following Terminal command to confirm that frames are being produced.
mrh@L540:~/Mary$ ls -latr # long listing files by time created
-rw-rw-r-- 1 mrh mrh 44110 Jul 8 20:30 000001-mary-staff.png
-rw-rw-r-- 1 mrh mrh 44110 Jul 8 20:30 000001-mary-easy.png
-rw-rw-r-- 1 mrh mrh 44171 Jul 8 20:30 000002-mary-staff.png
-rw-rw-r-- 1 mrh mrh 44171 Jul 8 20:30 000002-mary-easy.png
-rw-rw-r-- 1 mrh mrh 44173 Jul 8 20:30 000003-mary-staff.png
-rw-rw-r-- 1 mrh mrh 44173 Jul 8 20:30 000003-mary-easy.png
-rw-rw-r-- 1 mrh mrh 44174 Jul 8 20:30 000004-mary-staff.png
-rw-rw-r-- 1 mrh mrh 44174 Jul 8 20:30 000004-mary-easy.png
-rw-rw-r-- 1 mrh mrh 44177 Jul 8 20:30 000005-mary-staff.png
-rw-rw-r-- 1 mrh mrh 44177 Jul 8 20:30 000005-mary-easy.png
-rw-rw-r-- 1 mrh mrh 44291 Jul 8 20:30 000006-mary-staff.png
-rw-rw-r-- 1 mrh mrh 44291 Jul 8 20:30 000006-mary-easy.png
If you are using a laptop, this might be a good time to plug it in. You may notice that the fan has just started to run. That is because two cores of the computer are working at 100% CPU, making frames. This can drain the battery quickly.
Before we let these running processed complete all the frames of video,
we should check that the overlay (red line) is aligned with the staff lines.
We must wait for a few hundred frames of video to be made before we can determine this.
The command xdg-open is a linux command that opens a file in the "preferred" application.
mrh@L540:~/Mary$ xdg-open 000001-mary-staff.png # opens frame in "preferred" application
The default image viewer on your computer should be open now. Using the right-arrow key should advance the frames. If the viewer stops showing new frames, that is probably because that those frames haven't been produced, yet.
- Check that frames are being made by opening the first frame.

Figure 9: checking first frame
- Check that the red lines are in alignment with the staff-symbol for both the easy and staff frames.
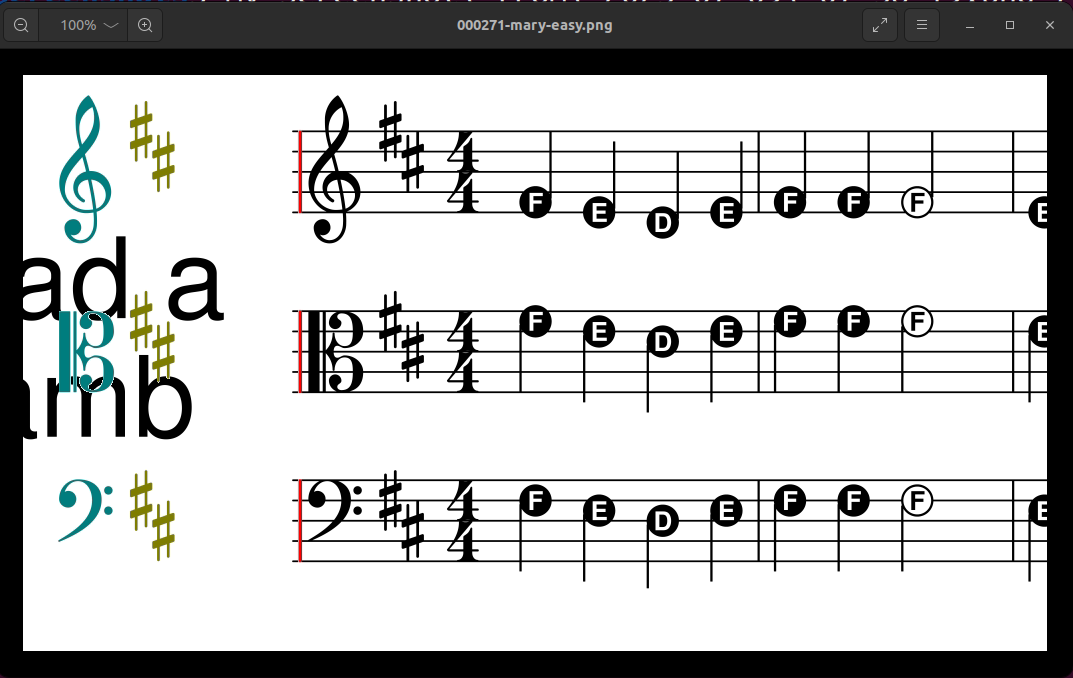
Figure 10: checking vertical alignment of red lines with staff-symbol
- Make note of the position of the red line at a particular frame number.
- Do this for both the
staffandeasyversion frames. The difference in position should be minimal.
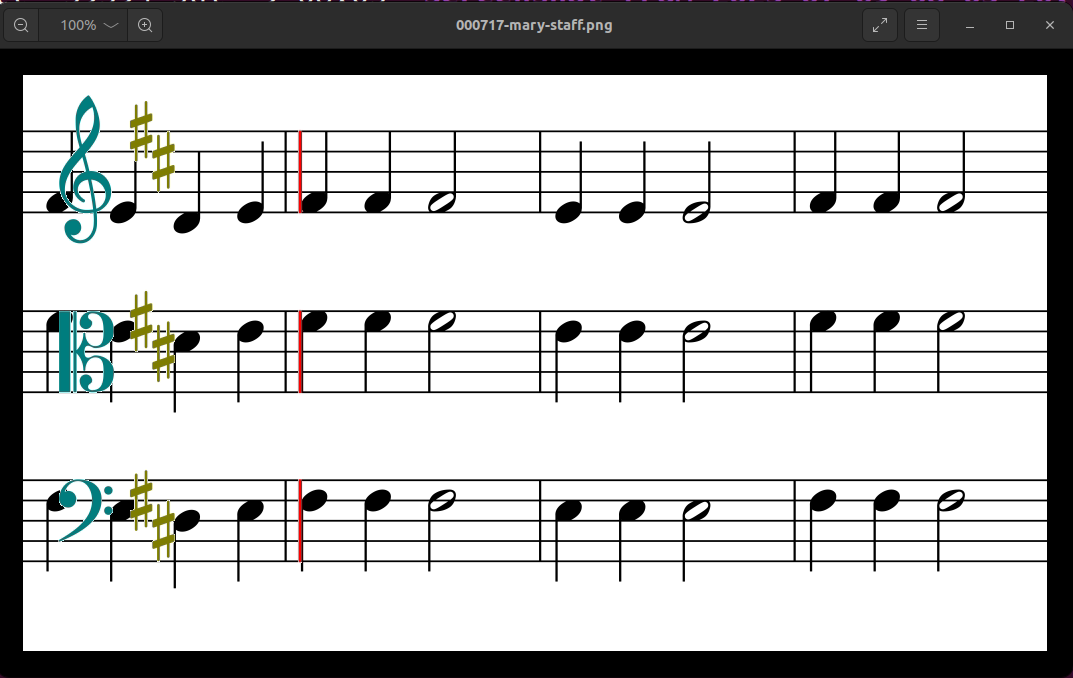
Figure 11: checking position of red line in STAFF version at frame 177.
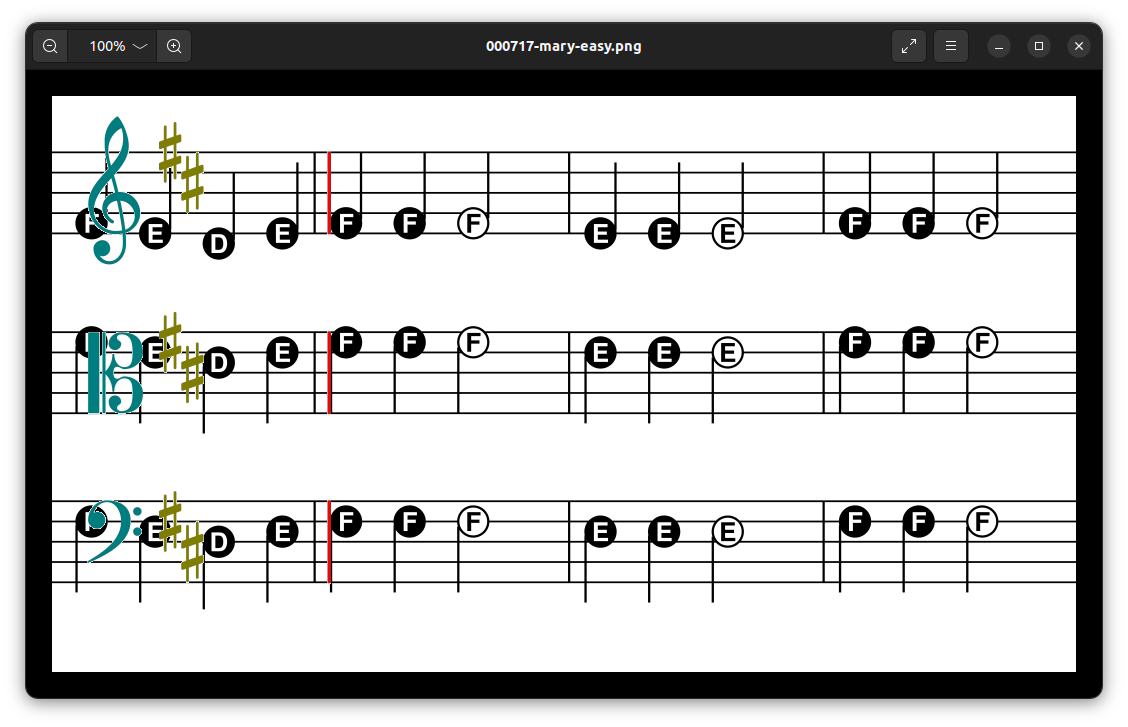
Figure 12: checking position of red line in EASY version at frame 177.
If frame creation is not working according to plan, you should "kill" the hidden Emacs buffers that are creating the frames. Type the following:
M-x kill-buffer ENTER ffmpeg-staff ENTER(then when prompted to continue, type)yesM-x kill-buffer ENTER ffmpeg-easy ENTER(then when prompted to continue, type)yes
Note: if you are new to Emacs, M-x means meta x.
Hold down the Meta key and press "x".
The "Meta" key, on my computer, is either the ALT or ESC key.
I suggest using the ALT key as the "Meta" key.
In Emacs, there are two basic methods for issuing commands.
The first method involves key combinations, such as C-c C-c, which we used, earlier.
The other method is to call Emacs functions by their name.
In the code, above, we issued the command kill-buffer by using its name.
Don't continue until ALL the frames are made. In our mary project, there are 2 measures of intro and 8 measures in the song. That equals 10 measures * 240 frames/measure. So, both the easy and the staff version have 2400 frames, each.
You can check if these 2400 frames have been created by typing this at the Terminal:
mrh@L540:~/Mary$ ls -latr *.png # lists most recently created png files
-rw-rw-r-- 1 mrh mrh 30902 Jul 8 20:58 002395-mary-easy.png
-rw-rw-r-- 1 mrh mrh 30962 Jul 8 20:58 002396-mary-easy.png
-rw-rw-r-- 1 mrh mrh 31062 Jul 8 20:58 002397-mary-easy.png
-rw-rw-r-- 1 mrh mrh 31162 Jul 8 20:58 002398-mary-easy.png
-rw-rw-r-- 1 mrh mrh 31210 Jul 8 20:58 002399-mary-easy.png
-rw-rw-r-- 1 mrh mrh 31000 Jul 8 20:58 002400-mary-easy.png
For some reason, my easy frames take a bit more time to process than my staff frames, so they are the last ones listed. Notice, above, that the command output stopped at 2400 frames. This means that frame creation is finished. As of the writing of this tutorial, I don't have a better way to indicate when this step has completed.
Now that all the frames for the staff and easy versions are created, combine those frames into videos. The following commands should each take a few moments to complete, causing Emacs to pause momentarily.
#+name: make-staff-video-only
#+begin_src emacs-lisp :results none
(shell-command
(concat
"ffmpeg -y -framerate " (number-to-string ORIGFPS)
" -pattern_type glob -i \'[0-9]*-" title "-staff.png\'"
" -r " (number-to-string ORIGFPS)
" video-" title "-staff.mp4"))
#+end_src
#+name: make-easy-video-only
#+begin_src emacs-lisp :results none
(shell-command
(concat
"ffmpeg -y -framerate " (number-to-string ORIGFPS)
" -pattern_type glob -i \'[0-9]*-" title "-easy.png\'"
" -r " (number-to-string ORIGFPS)
" video-" title "-easy.mp4"))
#+end_src
Now, play the video.
Note: I am using xdg-open to open the video in the "preferred" appliaction on my Linux computer.
You may need to change xdg-open to a command that works on your computer.
mrh@L540:~/Mary$ xdg-open mary-staff.mp4 # opens mary-staff.mp4 in "preferred" application
Keep in mind that we have not yet added audio to our video.
Recall that in :PROPERTIES: :header-args: :var BPM=60 :var ORIGBPM=60
I normally set :PROPERTIES: :ORIGBPM: to 60 at the beginning of a project.
Check that your video is, in fact, running at 60 BPM (beats per minute). You can do this with a watch or metronome.
Changing the speed of video
There are two methods to change the speed (tempo) of a video:
- Make new frames: Restart the project with a new :PROPERTIES: :header-args: ORIGBPM
- Drop/Add existing frames: Use the code blocks, below to change the speed without having to create new frames. This is the typical method I use in my projects. For this method, be sure to keep :PROPERTIES: :ORGBPM: at its starting value. You will only change :PROPERTIES: :BPM:. At certain speed changes, motion of the video can become jittery. This is because frames are created or dropped for the method, below. You will have to use aesthetic judgment about which method to use. The second method is faster. Another way to remedy jittery motion is to assign a higher value to :PROPERTIES: :ORGFPS:. This will result in larger file sizes and take longer to compile projects. Feel free to try 120fps instead of 60.
Go to the top of mary.org and change :PROPERTIES: :BPM: to a new value.
Now, evaluate the next two code blocks.
#+name: change-staff-video-speed
#+begin_src emacs-lisp :results none
(when (not (eq BPM ORIGBPM))
(shell-command
(concat
"ffmpeg -y -i video-" title "-staff.mp4"
" -filter:v \"setpts=PTS/"
(number-to-string (/ (float BPM) (float ORIGBPM))) "\" "
" video-" title "-staff-" (number-to-string BPM) "bpm.mp4")))
#+end_src
#+name: change-easy-video-speed
#+begin_src emacs-lisp :results none
(when (not (eq BPM ORIGBPM))
(shell-command
(concat
"ffmpeg -y -i video-" title "-easy.mp4"
" -filter:v \"setpts=PTS/"
(number-to-string (/ (float BPM) (float ORIGBPM))) "\" "
" video-" title "-easy-" (number-to-string BPM) "bpm.mp4")))
#+end_src
Two new videos should be created, each with the new BPM (beats-per-minute) value in their file-name.
Adding Audio
The process I use to record audio is very particular to my setup. That information may be less helpful to other users, so I am skipping it for the time being. Instead of sharing my own process, I will outline some strategies for creating audio. Here are some improtant points:
- The audio must be metronomic. Now, there is a workaround for audio that slows down and speeds up. I will share that later.
- When preparing audio, trim off all the silence from the beginning of the file all the way to the onset of the first sound. There is a linux utility called "aubio" which has an onset function I use to automatically perform this.
- Normalization: The audio level of a single project may not seem important, but when multiple .mp4 video/audio files are played, back to back, you will wish that you had normalized all the audio. Audio normalization can performed via a command-line utility called "ffmpeg-normalize" or in the Audacity audio-editor program.
- Trim: The audio should have the silence trimmed from the beginning and end. If trimming causes a sudden "cliff" in the audio waveform, this will create a "pop" in the final video. Applying short-duration fade-ins or fade-outs to the audio can eliminate the pops.
FFMpeg has a straightforward syntax for combining audio and video. Below is an example command from the Terminal.
mrh@L540:~/Mary$ ffmpeg -y i audio.mp3 -i video.mp4 -pix_fmt yuv420p -c:v libx264 -movflags +faststart output.mp4 # opens mary-staff.mp4 in "preferred" application
Explanation of the command, above:
- The option
-pix_fmt yuv420pmakes the video compatible with older, less powerful devices. - I am using the older
-c:v libx264also for compatibility with older playback devices. -movflags +faststartallows a browser to start playing the video before it has finished buffering.
FFmpeg has an extensive array of options and filters. I am not an expert on FFmpeg. Please consult the FFmpeg documentation if you want more information.
Next Steps
Once you get the "mary" project working, you will probably want to create your own projects. The hardest part of this will be getting LilyPond to display the music correctly. The LilyPond documentation is extensive. Feel free to reach out to me, via email, for LilyPond help. The good news is: Once you solve a technical problem in LilyPond, you have documented how you solved the problem, right inside the LilyPond document. Be sure to use plenty of comments in your LilyPond files. Backup your work!
Here are some typical problems / issues you may deal with in a new project:
- Different melody: find the
melody = { ... }definition. Change only the notes. Consult the LilyPond docs for syntax help. - Distinct melody in each part: Remove the
melody =definition, and replace theviolin =,viola =andcello =definitions withviolin = \relative c' {…insert music here…}, etc. - Different instruments: Change all occurrences of instrument names in mary.ly. Add another
\new Staff { ... }section to the scheme definition (\violinViolaCello). - Don't want mary-staff or mary-easy version: Comment out the
\book{ ... }block associated with the version you want omitted. To comment-out lines, preceed them with one or more%. - Music is too long: Try compressing the music by choosing a larger denominator in
proportionalNotationDuration = #(ly:make-moment 1/5) - Music is overflowing the bottom margin: Reduce the 3 values under
\override Staff.VerticalAxisGroup.default-staff-staff-spacing = ... - Area at/around bar lines is too crowded: Change
\override Score.SpacingSpanner.strict-note-spacing = ##tto##f. This will make the score slightly UN-proportional, but only a little bit. The music will look more natural. This change is typically done to scores containing measures ending with short note values (eighths, sixteenths).
Finally, there is a technique that will speed up the creation of videos.
Examine the file mary.org in Emacs. Find occurrences of a "second-level" headlines.
They start with two asterisks (**). All the code blocks under a "second-level" headline
can be evaluated by placing the curser somewhere under that headline, then typing: M-x org-babel-execute-subtree RET.
I have organized the "second level" headlines to accommodate this. There will still be certain places in the process,
however, where information may need to be added to :PROPERTIES: or examining output may need to happen.
Note: use "command completion". That means, once you type M-x (hold Alt, type x), you can then press the arrow-up key
to find the most recent command you issued.
Good luck!